


Are your kitchen cabinets looking tired and outdated? Painting them yourself can give your kitchen a fresh, new look without the cost of a full remodel.
But using a brush to paint cabinets might seem tricky if you’ve never tried it before. Don’t worry—you’re about to learn simple, step-by-step tips that will help you achieve a smooth, professional finish. By the end of this guide, you’ll have the confidence to transform your cabinets and make your kitchen shine.
Ready to get started? Let’s dive in!
Choosing The Right Brush
Choosing the right brush is key to a smooth kitchen cabinet paint job. The brush affects how the paint spreads and how the finish looks. Using the proper brush makes the work easier and the outcome neater. It also saves time and reduces mistakes.
Types Of Brushes For Cabinet Painting
Different brushes suit different paint types and surfaces. Here are the common types:
- Synthetic Brushes:Best for water-based or latex paints. They hold paint well and clean easily.
- Natural Bristle Brushes:Made from animal hair. Ideal for oil-based paints because they create a smooth finish.
- Foam Brushes:Good for small areas and touch-ups. They do not leave brush marks but wear out faster.
Brush Size And Bristle Material
Brush size matters for covering space and control:
- Use a 2 to 2.5-inch brush for cabinet doors and frames. It balances coverage and precision.
- Smaller brushes, around 1 inch, work well for corners and edges.
Bristle material affects paint flow and finish:
- Synthetic bristles resist water and stay firm, good for smooth strokes.
- Natural bristles absorb more paint but can leave texture behind.
Tips For Brush Maintenance
Proper care extends brush life and keeps paint jobs clean:
- Clean brushes immediately after use with the right solvent—water for latex, mineral spirits for oil-based paint.
- Remove excess paint by wiping the brush on the can edge before cleaning.
- Store brushes flat or hanging to keep bristles straight.
- Avoid soaking brushes for long periods to prevent damage.
Preparing Kitchen Cabinets
Preparing your kitchen cabinets properly is the key to a flawless paint job that lasts. Skipping or rushing this step can lead to peeling paint and uneven surfaces. Taking time to prep will save you hours of frustration later and make your cabinets look professionally done.
Removing Hardware And Doors
Start by taking off all the cabinet doors, drawers, and hardware like knobs and hinges. Use a screwdriver to carefully remove these parts and keep the screws in labeled containers.
Removing everything might feel tedious, but it makes painting easier and prevents accidental smudges. Have you ever tried painting around hardware? It’s frustrating and rarely looks neat.
Cleaning And Degreasing Surfaces
Kitchen cabinets often have grease and dirt buildup from cooking. Use a degreaser or a mixture of warm water and dish soap to scrub every surface thoroughly.
Don’t skip this step—paint won’t stick well to greasy surfaces. I once painted cabinets without cleaning properly, and the paint started peeling within weeks.
Sanding For Smooth Finish
Sanding is crucial to roughen the surface and help the paint adhere better. Use medium-grit sandpaper (around 120-150 grit) to sand all surfaces lightly.
Focus on edges and any glossy areas. If you skip sanding, you might end up with a patchy finish that looks amateurish. How smooth are your cabinets now?
Repairing Imperfections
Look closely for dents, scratches, or holes. Fill these imperfections with wood filler or putty and let it dry completely.
After drying, sand the repairs smooth so they blend seamlessly with the cabinet surface. Fixing these flaws upfront makes a huge difference in the final look.
Priming Cabinets
Painting kitchen cabinets with a brush can refresh your kitchen. Start by removing cabinet doors and hardware. Apply a primer to ensure smooth paint adhesion. Use a quality brush for even strokes. Allow each coat to dry completely before adding the next.
Enjoy your beautifully updated cabinets!
Priming kitchen cabinets is an essential step for a flawless finish. It ensures the paint adheres well and lasts longer. Priming also helps to cover old stains or dark colors.
Selecting The Appropriate Primer
Choosing the right primer is crucial. Use an oil-based primer for a durable finish. It works well on wood surfaces. If your cabinets have been painted before, a bonding primer is ideal. It sticks to tricky surfaces without sanding. Consider stain-blocking primers for cabinets with heavy stains. They prevent discoloration from seeping through.
Applying Primer With A Brush
Apply primer with a quality brush. Start with the cabinet doors. Use long, even strokes for a smooth coat. Don’t overload the brush with primer. It can cause drips and uneven texture. Cover all areas, including corners and edges. Pay extra attention to grooves and decorative details. A small, angled brush works well for these parts.
Drying And Sanding Between Coats
Let the primer dry completely. Check the manufacturer’s instructions for drying time. After drying, lightly sand the surface. Use fine-grit sandpaper for a smooth finish. Sanding removes any brush marks or raised grain. Wipe away dust with a damp cloth before applying the next coat. Repeat the process for a second coat if needed. This ensures a solid base for your paint.
Choosing The Paint
Choosing the right paint is a crucial step when painting your kitchen cabinets with a brush. The type of paint you select affects not only the look but also the durability of your cabinets. Picking the correct color and finish can transform your kitchen from dull to stunning with just a few strokes.
Types Of Paint Suitable For Cabinets
Cabinets need paint that can handle frequent use and cleaning. Acrylic latex paint is a popular choice because it cleans easily and resists chipping. Oil-based paint offers a smooth, hard finish but takes longer to dry and has stronger fumes.
Consider cabinet-specific paints designed for durability and smooth application. These paints often have built-in primers, saving you a step and improving adhesion.
Color Selection Tips
Think about your kitchen’s overall style and lighting before picking a color. Light colors can make a small kitchen feel larger, while darker shades add richness and depth. Don’t overlook how cabinet color will coordinate with your countertops, backsplash, and walls.
Test paint samples on a small cabinet area to see how colors look throughout the day. Are you aiming for a timeless look, or do you want to add a bold pop of color? Your choice should reflect your personality and how you use the space.
Paint Finish Options
The finish impacts both appearance and maintenance. Satin finish is a favorite because it offers a soft sheen and hides imperfections well. Semi-gloss is more durable and easier to clean, making it ideal for busy kitchens.
Matte finishes can be trendy but may show stains and marks more easily. Think about how much wear your cabinets will get and choose a finish that balances beauty and practicality.
Painting Technique
Painting kitchen cabinets with a brush requires a careful technique. Proper handling of the brush affects the final look. Smooth and even strokes help avoid streaks and marks. Attention to details and corners ensures a professional finish. Follow these tips to improve your painting skills.
Loading The Brush Properly
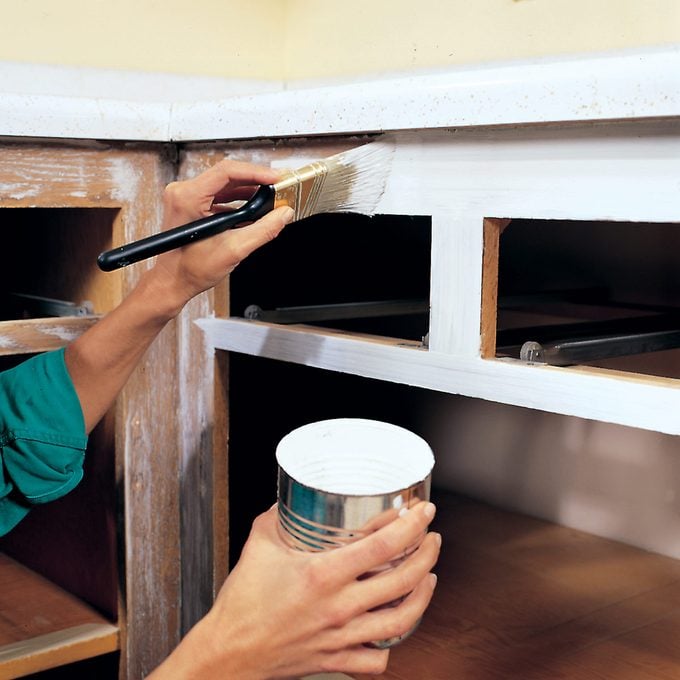
Dip the brush about one-third into the paint. Avoid overloading to prevent drips and uneven coating. Tap the brush gently on the side of the can. This removes excess paint and controls flow. A well-loaded brush spreads paint evenly across surfaces.
Applying Paint In Smooth Strokes
Use long, even strokes for a smooth finish. Paint in the direction of the wood grain if visible. Keep a light touch to avoid brush marks. Overlapping strokes blend paint layers seamlessly. Maintain a wet edge to stop lines from drying.
Working Around Details And Corners
Use the brush tip for tight spots and edges. Paint small sections slowly for better control. Corners need gentle strokes to avoid buildup. Take your time to cover grooves and trims well. Proper technique here prevents missed spots.
Avoiding Common Brush Marks
- Don’t press the brush too hard on the surface.
- Keep strokes consistent in length and direction.
- Thin paint layers dry faster and smoother.
- Sand lightly between coats to remove imperfections.
- Use high-quality brushes for better control.

Credit: www.youtube.com
Applying Additional Coats
Applying additional coats is a crucial part of painting kitchen cabinets with a brush. It ensures durability and a smooth, professional finish. Skipping or rushing this step can leave your cabinets looking uneven or prone to chipping.
When To Apply The Next Coat
Knowing the right time to add another coat can be tricky. You should wait until the previous layer is completely dry, usually around 4 to 6 hours, depending on your paint type and room conditions.
Touch the surface lightly; if it feels tacky or soft, give it more time. Painting too soon can cause streaks or peeling later on.
Sanding Between Coats
Sanding between coats is a step many skip but it makes a big difference. Use fine-grit sandpaper (220 grit works well) to lightly smooth out any bumps or brush marks.
This step helps the next coat stick better and creates a flawless finish. Remember to clean off the dust with a tack cloth before painting again.
Ensuring Even Coverage
Applying paint evenly can be challenging with a brush, but it’s essential. Use long, smooth strokes and avoid overloading your brush to prevent drips and thick spots.
Check your work under different light angles to spot missed areas or uneven spots. A second or third coat may be needed to achieve the rich, uniform look you want.
Drying And Curing
Drying and curing are crucial steps after painting kitchen cabinets. Proper drying helps prevent smudges and damage. Curing ensures the paint hardens fully for lasting protection. Skipping these steps can reduce your paint job’s quality and life.
Recommended Drying Times
Drying times depend on paint type and room conditions. Most latex paints dry to touch within one hour. Oil-based paints take longer, usually 6 to 8 hours. Wait at least 24 hours before handling cabinets. For best results, allow 48 hours before reattaching hardware.
Avoiding Dust And Debris
Keep the painted cabinets in a clean, dust-free room. Close windows and doors to reduce airborne particles. Use a fan to improve air circulation but avoid blowing dust onto wet paint. Cover nearby surfaces with drop cloths to catch falling debris. Avoid touching cabinets during drying to prevent marks.
Curing For Durability
Curing lets paint fully harden beyond just drying. This process can take up to 30 days. During curing, avoid heavy use or cleaning of cabinets. The paint will become tougher and more resistant to scratches. Patience here will pay off with a durable finish that lasts.
Credit: www.cabinetnow.com
Reassembling Cabinets
Reassembling your kitchen cabinets after painting is the moment when your hard work truly comes together. This stage demands patience and attention to detail to ensure everything fits perfectly and looks polished. Taking your time here will help you enjoy a fresh, professional finish that lasts.
Reattaching Hardware
Start by gathering all the hardware you removed earlier, such as handles, knobs, and hinges. Clean each piece thoroughly to remove any paint splatters or dust. Reattaching hardware is easier if you use a screwdriver that fits well; this reduces the risk of stripping screws or damaging the hardware.
Check each screw hole carefully. If paint has clogged any holes, gently clear them with a drill or a small nail before reattaching. This ensures the hardware sits flush and doesn’t cause your doors or drawers to hang unevenly.
Hanging Doors Back
Hanging the doors back onto the cabinet frames requires a steady hand. Align the hinges carefully with the screw holes, then tighten the screws just enough to hold the door in place. This allows you to adjust the door for perfect alignment before fully tightening.
Look closely at the gaps between the doors and the cabinet frame. Are they consistent? If not, adjust the hinges slightly. This step can make a huge difference in the overall look, giving your kitchen a clean, custom appearance.
Final Touch-ups
After everything is reassembled, inspect your cabinets under good lighting. Look for small paint drips, missed spots, or areas where the paint might have rubbed off during reassembly. Use a fine brush to fix these spots carefully.
Ask yourself: Does the finish feel smooth and even? If not, consider lightly sanding rough spots and applying a thin touch-up coat. Taking this extra time ensures your cabinets look flawless and will stand up to daily use.
Maintenance Tips
Keeping your freshly painted kitchen cabinets looking sharp takes some care. Maintenance isn’t just about cleaning; it’s about protecting your hard work and knowing how to fix small issues before they become big problems. Let’s look at some practical tips that will help your cabinets stay beautiful for years.
Cleaning Painted Cabinets
Use a soft cloth or sponge with warm, soapy water to clean your cabinets. Avoid harsh chemicals or abrasive scrubbers that can wear down the paint finish.
Try wiping spills immediately to prevent stains. Regular gentle cleaning keeps the paint vibrant without damaging it.
Avoiding Damage
Be mindful of how you handle your cabinets daily. Avoid slamming doors or scraping the surface with sharp objects.
Consider adding bumpers inside cabinet doors to reduce impact noise and protect the paint. Also, watch out for moisture buildup, especially near sinks, which can cause paint to peel or bubble.
Touch-up Techniques
Keep some leftover paint handy for quick fixes. If you notice small chips or scratches, lightly sand the area first to smooth it out before repainting.
Use a fine brush to carefully apply paint only where needed. This targeted approach helps maintain a seamless look without repainting the entire cabinet.
Credit: www.familyhandyman.com
Frequently Asked Questions
What Type Of Brush Is Best For Painting Cabinets?
A high-quality synthetic bristle brush works best. It provides smooth coverage without streaks. Choose a 2-2. 5 inch angled brush for detailed edges and corners.
How Do I Prepare Kitchen Cabinets For Painting?
Clean cabinets thoroughly to remove grease and dirt. Sand surfaces lightly to ensure paint adhesion. Remove hardware and tape edges for a neat finish.
How Many Coats Of Paint Are Needed On Cabinets?
Usually, two to three coats are ideal. The first coat acts as a primer. Additional coats build durability and ensure even color.
Can I Paint Kitchen Cabinets Without Sanding?
Sanding is recommended for better paint adhesion. However, using a deglosser can be an alternative. It prepares surfaces by removing the glossy finish.
Conclusion
Painting kitchen cabinets with a brush takes patience and care. Start with clean, dry surfaces for best results. Apply thin, even coats to avoid drips and brush marks. Let each layer dry before adding the next one. Take your time, and don’t rush the process.
A fresh coat of paint can brighten your kitchen and save money. Small steps lead to big changes. Enjoy the satisfaction of your handiwork every time you open the cabinet doors. Keep your tools clean for future projects. Painting cabinets by hand feels rewarding and personal.


