


Are you ready to bring your dream kitchen to life? Knowing how to make a kitchen drawing is the first step to turning your ideas into reality.
Whether you want to redesign your space or build a new one, a clear and simple kitchen plan helps you see everything before the work begins. In this guide, you’ll discover easy steps to create a kitchen drawing that fits your style and needs.
By the end, you’ll have the confidence to design a kitchen that’s both beautiful and practical. Keep reading, and let’s make your perfect kitchen happen!
Tools And Materials Needed
Creating a kitchen drawing needs specific tools and materials. These help bring your ideas to life clearly and accurately. Choosing the right items makes the process easier and more enjoyable.
Essential Drawing Tools
Start with basic tools for sketching and measuring. These ensure your drawing is neat and precise.
- Pencil: Use a sharp pencil for clear lines.
- Eraser: Correct mistakes without smudging.
- Ruler: Draw straight lines and measure distances.
- Graph paper: Helps keep proportions right.
- Protractor: Measure and draw angles accurately.
- Compass: Draw circles or arcs for round shapes.
Recommended Software Options
Software can simplify kitchen drawing and add detail. Choose one that fits your skill level and needs.
- SketchUp: Good for 3D modeling with simple controls.
- AutoCAD: Professional tool for detailed and precise plans.
- RoomSketcher: User-friendly with drag-and-drop features.
- Sweet Home 3D: Free and easy for basic designs.
- Planner 5D: Creates realistic 3D kitchen layouts.
Measuring Your Kitchen Space
Measuring your kitchen space is the first step in creating an accurate kitchen drawing. Precise measurements ensure your design fits perfectly within the room. This process helps avoid costly mistakes and saves time later. Take your time and be thorough to capture every detail.
Taking Accurate Measurements
Start by measuring the length and width of your kitchen walls. Use a tape measure for best results. Measure from corner to corner, keeping the tape straight and level. Note the height of the walls from floor to ceiling as well.
Measure doors, windows, and any other openings. Include their width and height. Also, measure distances from edges of openings to the nearest corners. Don’t forget to check the depth and height of cabinets or appliances already in place.
Double-check each measurement to ensure accuracy. Small errors can cause big problems in your drawing.
Recording Measurements Effectively
Write down all measurements clearly on paper or a digital device. Use a sketch of your kitchen to mark each measurement where it belongs. This visual aid makes it easier to understand the space.
Organize measurements by category, such as walls, doors, and windows. Use a table for neatness and clarity. Here is a simple example:
| Feature | Width (ft) | Height (ft) |
|---|---|---|
| Wall 1 | 12 | 8 |
| Window | 4 | 3 |
Review your notes before starting your kitchen drawing. Accurate records make the design process smoother and more precise.
Sketching The Basic Layout
Sketching the basic layout sets the foundation for your kitchen design. It shows the room’s size and shape. Start simple. Focus on the main walls and openings first. This ensures your kitchen will fit well in the space. A clear layout helps plan appliances and furniture later.
Drawing Walls And Openings
Begin by drawing the kitchen walls on graph paper or a digital tool. Use a scale, like 1 square equals 1 foot, to keep proportions correct. Mark all walls clearly, including any partial or half walls. Show the thickness of walls to add realism.
Indicate openings such as archways or pass-throughs. These affect traffic flow and cabinet placement. Use simple lines or shaded areas to differentiate openings from solid walls.
Placing Doors And Windows
Mark the position of doors on your layout next. Show the door swing direction with a curved line. This helps avoid placing furniture where doors open.
Next, add windows. Note their size and height from the floor. Windows provide natural light and ventilation. Plan work areas around them for better comfort.
Keep these points in mind:
- Draw doors and windows to scale
- Show exact placement on walls
- Account for clearance space
- Think about how light enters the room
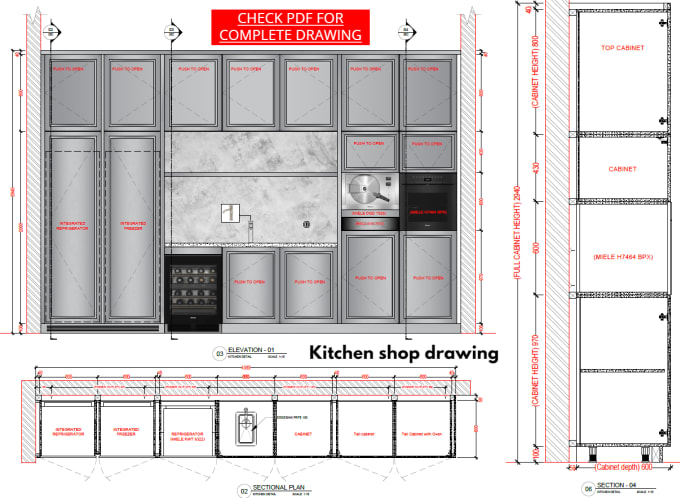
Credit: www.fiverr.com
Adding Kitchen Fixtures
Start by sketching the kitchen layout with clear space for fixtures. Mark locations for sinks, faucets, and lighting to ensure proper placement. Use simple symbols to represent each fixture for easy understanding.
Adding kitchen fixtures is an exciting phase in creating a functional and stylish kitchen design. This is where your vision begins to take shape as you decide on the placement of cabinets, countertops, and appliances. Every choice you make will directly impact both the efficiency and aesthetic of your space.
Positioning Cabinets And Countertops
Deciding where to place cabinets and countertops is like solving a puzzle. You want everything to fit together seamlessly. Start by considering your kitchen’s workflow. Will you have enough space between the sink and the stove? Keep in mind the kitchen triangle rule: the sink, refrigerator, and stove should form a triangle for optimal efficiency. When I redesigned my kitchen, I realized that having a countertop right next to the fridge made it easier to unload groceries. You might find similar insights as you visualize your space.
Including Appliances
Including appliances in your kitchen drawing isn’t just about fitting them into your space. It’s about ensuring they complement your kitchen’s functionality and style. Think about the tasks you perform most often. Is the dishwasher close to the sink for easy loading? Can you access the microwave without crossing the main cooking area? A friend once pointed out that having the oven and fridge doors opening into each other was a hassle. I learned from her mistake and made sure to avoid this in my layout. Remember, your kitchen should work for you, making daily tasks easier and more enjoyable. Consider every detail carefully, and you’ll create a space that’s both practical and inviting.
Incorporating Electrical And Plumbing Elements
Adding electrical and plumbing elements to your kitchen drawing is essential for a functional space. These systems must be planned carefully to avoid costly mistakes later. You want to ensure everything fits seamlessly with your kitchen layout without interfering with cabinets or appliances.
Marking Outlets And Switches
Start by identifying where you’ll need power outlets and light switches. Think about countertop appliances like toasters and coffee makers—these require easy access to power.
Place outlets above the countertops at regular intervals, usually every 4 feet, to keep cords manageable. Don’t forget to include switches for overhead lighting and under-cabinet lights if you want added brightness.
Consider appliances that need dedicated circuits, such as a microwave or dishwasher. Mark these clearly on your drawing with symbols or notes to avoid confusion during installation.
Planning Plumbing Connections
Your kitchen sink, dishwasher, and refrigerator with water dispensers all need plumbing connections. Begin by pinpointing the main water supply and drainage points on your drawing.
Keep plumbing lines as short and direct as possible to reduce material costs and improve water pressure. If you’re moving plumbing fixtures, verify the feasibility with a professional to avoid unexpected expenses.
Remember to allocate space for shut-off valves and water filters. Adding these details early will save headaches during the build and make maintenance easier down the road.

Credit: www.fiverr.com
Finalizing The Drawing
Finalizing a kitchen drawing is the last but crucial phase. It ensures the design is clear, accurate, and ready to use. This step helps avoid mistakes during the actual kitchen setup. Careful attention to detail improves the drawing’s quality and usability.
Reviewing And Adjusting Details
Start by checking every part of the drawing carefully. Look for errors in measurements and placements. Verify that cabinets, appliances, and fixtures fit well together. Confirm that door swings and clearances are correct. Adjust any mistakes or unclear elements. This review prevents issues during construction or installation.
Ask yourself if the layout is practical and comfortable. Make sure work zones like cooking, cleaning, and storage flow smoothly. Small changes here can improve daily kitchen use significantly.
Creating A Clean, Presentable Layout
Organize the drawing for easy reading and understanding. Use neat lines and clear labels for all parts. Apply consistent symbols and icons to represent appliances and furniture. Use a simple color scheme to highlight important areas if needed.
Remove unnecessary marks and clutter. Keep space around text and drawings for clarity. Consider adding a legend or key to explain symbols. A tidy layout makes the drawing professional and easy to follow.
Tips For Beginners
Starting a kitchen drawing can feel tricky for beginners. Simple tips help make the process easier and clearer. Understanding basic rules saves time and avoids frustration. A good drawing shows exact measurements and layout ideas. Focus on clear lines and neat details. Take your time with each part of the drawing. Practice helps improve skills and build confidence.
Common Mistakes To Avoid
- Ignoring measurements causes wrong fit of kitchen elements.
- Skipping a plan leads to messy and unclear drawings.
- Using unclear symbols confuses anyone reading the drawing.
- Not checking scale can make the kitchen look too big or small.
- Forgetting to add space for doors and windows limits real use.
Improving Accuracy And Efficiency
- Use graph paper to keep lines straight and measurements correct.
- Draw basic shapes first, then add details step by step.
- Label all parts clearly for easy understanding later.
- Double-check measurements before drawing final lines.
- Use a ruler or drawing tools to keep lines neat and precise.
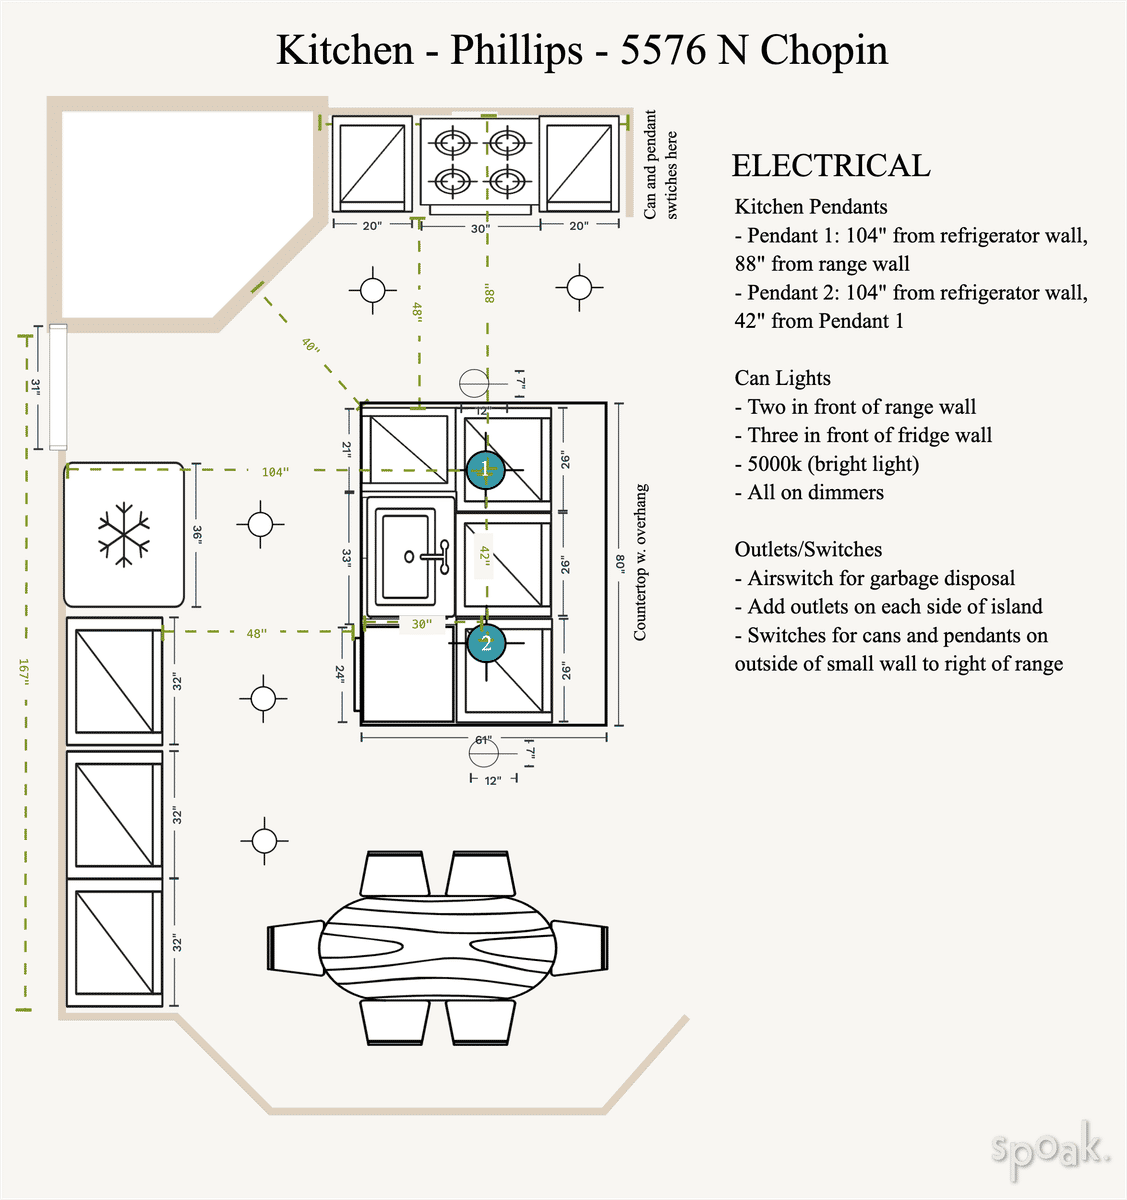
Credit: www.spoak.com
Frequently Asked Questions
What Tools Are Needed For Kitchen Drawing?
Essential tools include graph paper, pencils, rulers, erasers, and measuring tape. Digital software like AutoCAD can also help create precise kitchen drawings.
How To Start A Kitchen Drawing Plan?
Begin by measuring your kitchen space accurately. Sketch the floor plan, including doors, windows, and existing fixtures. Add cabinetry and appliance placements next.
What Are Key Measurements In Kitchen Drawing?
Key measurements include wall lengths, counter heights, appliance sizes, and spacing between elements. Accurate measurements ensure functionality and flow in your kitchen design.
How To Make Kitchen Drawings More Detailed?
Add dimensions, labels, and materials to your drawing. Include electrical outlets, lighting fixtures, and plumbing points for a comprehensive plan.
Conclusion
Creating a kitchen drawing helps plan your space clearly. It shows where appliances and cabinets will go. This drawing guides your work and saves time. You can change ideas easily on paper first. It also helps you avoid costly mistakes later.
Take your time and measure carefully. Use simple tools and follow steps one by one. A clear kitchen drawing makes building or remodeling easier. Start your project with a good plan in hand. Your kitchen will look better and work well.


