


Are you struggling to remove a kitchen drawer stuck on its track? You’re not alone.
Many people find this task frustrating and tricky. But what if you could do it quickly and easily, without breaking anything or calling a professional? In this guide, you’ll discover simple steps to take your kitchen drawer out smoothly. By the end, you’ll have the confidence to handle it yourself and keep your kitchen in perfect working order.
Keep reading—you’re just moments away from mastering this handy skill!

Credit: www.youtube.com
Identify Drawer Type
Identifying the type of kitchen drawer slide is important before removal. Different slides have different mechanisms and removal steps. Knowing the type helps prevent damage and ensures smooth removal.
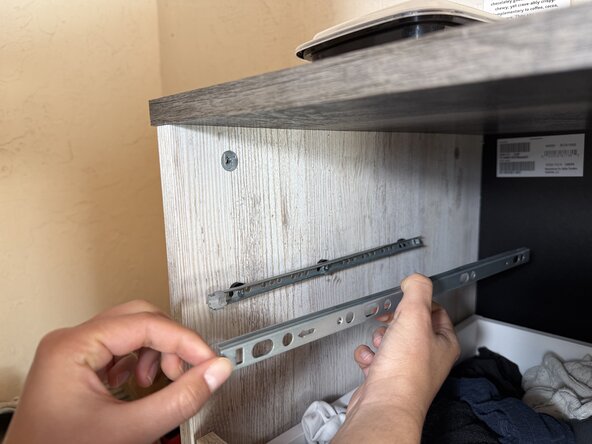
Side-mounted Slides
Side-mounted slides attach on each side of the drawer. They are visible when the drawer is open. These slides usually have metal rails with ball bearings or rollers. To remove the drawer, look for a lever or clip on the side of the slide. Press or lift it to release the drawer from the track.
Under-mounted Slides
Under-mounted slides are hidden beneath the drawer. They offer a cleaner look and smoother glide. These slides often have a plastic or metal lever under the drawer. Locate the lever and press or pull it to unlock the drawer. Then, gently pull the drawer out of the cabinet.
Center-mounted Slides
Center-mounted slides run along the middle underside of the drawer. They are a single metal rail attached to the cabinet and drawer bottom. To remove, open the drawer fully. Then, lift it up slightly while pulling it out. This action frees the drawer from the center track.
Prepare The Area
Before you start removing a kitchen drawer from its track, setting up the area properly is crucial. This step makes the process smoother and helps avoid any accidental damage to your kitchen or the drawer itself. Taking a few moments to prepare can save you time and frustration later.
Clear Drawer Contents
Empty the drawer completely. Removing everything inside prevents items from falling out and breaking when you pull the drawer out. It also lightens the drawer, making it easier to handle.
Have you ever tried pulling out a drawer only to have a bunch of things spill everywhere? Clearing it out first keeps your space tidy and your tools within reach.
Gather Necessary Tools
Collect all the tools you’ll need before starting. Most kitchen drawers require a screwdriver (usually Phillips or flathead), and sometimes pliers or a putty knife can help.
Having your tools ready means you won’t have to stop mid-task to find what you need. Think about where you’ll set the drawer once it’s out—lay down a towel or soft cloth to protect it and your floor.
Release Drawer Locks
Release drawer locks carefully to remove kitchen drawers from their tracks. Locks keep the drawer securely in place during use. Releasing these locks allows the drawer to slide out smoothly. Different types of drawers use different locking mechanisms. Identifying the correct lock type is key to removing the drawer safely.
Locate Locking Mechanisms
Look inside the drawer sides or under the drawer base. Locks often appear as small tabs or levers. Check both sides for symmetrical locks. Some locks are visible; others require pulling the drawer slightly out to see. Use a flashlight for better visibility in dark cabinets.
Unlock Side-mounted Drawers
Side-mounted drawers usually have plastic or metal clips on the tracks. Press or squeeze the clips inward while pulling the drawer out. Some clips need to be lifted upward to release. Avoid forcing the drawer, which can damage the lock or track. Work gently for smooth removal.
Unlock Under-mounted Drawers
Under-mounted drawers have locking tabs beneath the drawer bottom. Push the tabs toward the center or pull them away from the cabinet walls. This action releases the drawer from the track. Sometimes you must lift the drawer slightly as you move the tabs. Handle the drawer with care to avoid damage.
Credit: www.ifixit.com
Remove Drawer From Track
Begin by fully opening the drawer to access the tracks. Gently lift or press the release levers on each side to free the drawer. Carefully pull the drawer out, keeping it level to avoid damage.
Removing a kitchen drawer from its track might seem like a daunting task, but it’s actually simpler than you might think. Whether you’re looking to clean behind it or replace a broken component, knowing how to properly remove a drawer is a handy skill. With just a little bit of guidance, you can accomplish this task efficiently and without any hassle.
Lift And Pull Method
The lift and pull method is typically the easiest way to remove a drawer, especially if your drawer uses a simple side-mounted track. Start by pulling the drawer out as far as it will go. Firmly grasp the sides of the drawer near the front, then gently lift it up to disengage the wheels or latches from the track. If you feel resistance, don’t force it. Instead, check to see if there’s a release lever or latch on the track. Once you lift the drawer slightly, pull it towards you in a straight, smooth motion. This method is perfect for most standard kitchen drawers and doesn’t require any special tools.
Tilt And Slide Method
For drawers with bottom-mounted tracks, the tilt and slide method might be more effective. First, extend the drawer fully so you can reach the back. Carefully tilt the drawer upwards by lifting the front slightly higher than the back. This action helps disengage the runners from the track. As you tilt, gently slide the drawer out towards you. Keep a steady hand to prevent any jerky movements that might damage the track or drawer. This method is particularly useful for drawers that hold heavier items, as it allows you to carefully control the removal process. Have you ever wondered why some drawers seem impossible to remove? Often, it’s just a matter of finding the right method for your specific drawer type. By using either the lift and pull or the tilt and slide technique, you can masterfully remove your kitchen drawer with ease.
Handle Stuck Drawers
Handle stuck drawers can be a real hassle in the kitchen. They slow down your work and cause frustration. Removing these drawers carefully can save you time and prevent damage. The key is to identify why the drawer is stuck and fix it gently. Here are some simple tips to help you remove a drawer stuck on its track.
Check For Obstructions
Look inside the drawer and around the tracks for any objects blocking movement. Small items like crumbs, screws, or pieces of packaging often cause jams. Use a flashlight to see clearly. Remove any debris you find with a soft cloth or a small brush. Sometimes, dirt buildup on the tracks can also stop the drawer from sliding smoothly.
Lubricate Tracks
Apply a small amount of lubricant to the drawer tracks to ease movement. Use a silicone spray or a light machine oil for best results. Avoid heavy grease, as it can attract dust and dirt. Spray lightly along the metal or plastic tracks, then move the drawer back and forth a few times. This helps the lubricant spread evenly and reduces friction.
Use Gentle Force
Pull the drawer slowly and steadily to avoid damage. Avoid yanking or using sharp tools to pry it open. If the drawer still won’t budge, try pushing it in slightly then pulling again. This can realign the tracks and release the stuck drawer. Patience is important here—gentle force often solves the problem without breaking anything.

Credit: www.youtube.com
Reinstall Drawer
Reinstalling a kitchen drawer after removing it from the track requires care and attention. Proper alignment and secure fastening ensure the drawer works smoothly. Follow these key steps to put the drawer back correctly and avoid future problems.
Align Tracks Properly
Check the tracks inside the cabinet and on the drawer. They must match and face the right direction. Slide the drawer gently onto the tracks, making sure both sides fit evenly. Misaligned tracks cause the drawer to jam or fall off.
Secure Locks
Many drawers have locking clips or catches on the tracks. Push the drawer fully in and press these locks to hold the drawer in place. If the locks are loose or broken, replace them before reinstalling. This step keeps the drawer from sliding out unexpectedly.
Test Smooth Movement
Open and close the drawer several times. It should slide easily without sticking or wobbling. Listen for any unusual sounds like scraping or clicking. Smooth movement means the drawer is installed correctly and ready for daily use.
Frequently Asked Questions
How Do I Remove A Stuck Kitchen Drawer From Its Track?
To remove a stuck kitchen drawer, first empty it. Locate the locking clips or levers under the drawer sides. Press or lift them gently while pulling the drawer straight out. Avoid forcing to prevent damage to the track or drawer.
What Tools Are Needed To Remove A Kitchen Drawer?
Usually, no tools are needed to remove a kitchen drawer. However, a screwdriver may help if the drawer is screwed to the track. Gloves can protect your hands while handling metal tracks or clips. Always check for screws before pulling.
How Can I Prevent Damage When Removing A Kitchen Drawer?
Remove all contents first to lighten the drawer. Use both hands to pull evenly and steadily. Avoid jerking or forcing the drawer off the track. Check for locking mechanisms and release them carefully to prevent damage.
Why Won’t My Kitchen Drawer Slide Off The Track?
Your drawer may have locking clips or safety stops engaged. Dirt or debris can also jam the tracks. Inspect the sides and bottom for obstructions. Clean the tracks and release any locks before attempting removal.
Conclusion
Removing a kitchen drawer from its track is simple with the right steps. Take your time and follow each part carefully. This helps avoid damage and keeps your drawer working well. Practice makes the process easier and quicker. Now, you can confidently handle drawer removal for cleaning or repair.
Keep these tips handy for future use. A smooth kitchen drawer makes daily tasks more pleasant.


